| Ingredients for APM Support
|
- A kernel compiled with APM support. Redhat 5.2 and
previous do not have APM support built into the stock kernels by
default. Redhat 6.0 does, but the APM driver's interrupt
handling is not configured
appropriately for newer ThinkPads (although it should work form
most laptops). Therefore, you will need to compile your
own kernel with properly-configured APM support.
- Optional: The APM Daemon
. APMD is a set of programs that
controls the Advanced Power Management system found in most
modern laptop computers. It communicates with the kernel APM
driver, above. This package is included with Redhat Linux and
is probably installed already. If not, install it using RPM. If you don't know how to use
RPM, this reference guide ought to help.
- Optional: APM monitors. APM-aware battery monitors are
available for various window managers and desktop environments
like WindowMaker/GNOME and KDE. As an example, an iconized
application like wmapm is designed to live in
WindowMaker's Dock:

| Compiling an APM-Capable Kernel
|
- Step 1: Grab the latest kernel source code from www.kernel.org -- or rather,
please use one of its
mirrors. I will use kernel 2.2.13 for my examples.
- Step 2: Log in as root. Then cd /usr/src. I usually remove or
rename the existing linux subdirectory there. Then
unarchive the linux source tree:
- If it's in .bz2 format: bunzip2 -c linux-2.2.13.tar.bz2 |
tar xvf -
- If it's in .gz format: tar xvzf linux-2.2.13.tar.gz
- Step 3: Now cd /usr/src/linux. I recommend that you perform the
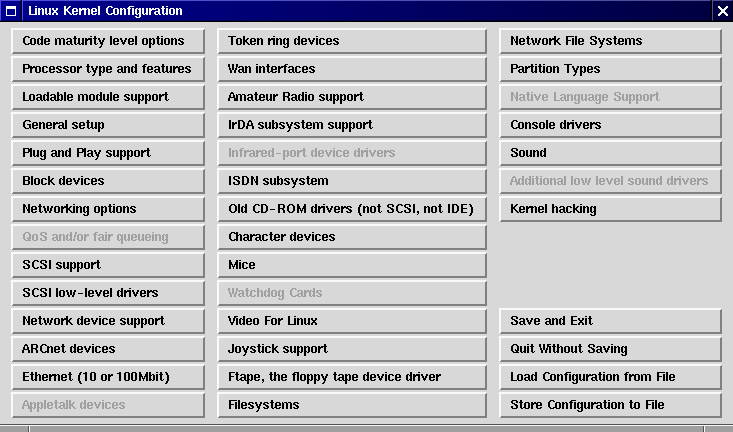
kernel configuration in X-Windows. Type make
xconfig. Shortly, a kernel configuration window will pop
up:

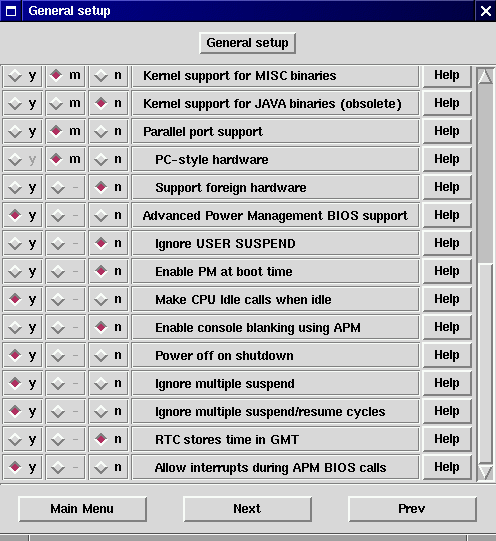
- Start at the top left -- each window will lead you to the next
window, and there is help for each option. The missing Allow
Interrupts During APM BIOS calls option
for proper APM support in newer Thinkpads is shown here, under General
Options:

- Here's some help! In case you aren't already an experienced
kernel-compiler, I've included my kernel
configuration file for kernel 2.2.13 here. Just select the
"Load Configuration from File" option, load the file
("gromit-2.2.13"; gromit's the name of my laptop) browse my options
(altering to suit), and then hit "Save and Exit". I provide this file
"as-is". If I left out a kernel option you like or need, it's not my
problem.
- Step 4: All done? OK, click on Save and Exit. Now type make
dep, then make clean, then make zImage, then
make modules, then make modules_install. If you
like, you can type these all on one line, each separated by a
semicolon (;). In 5 minutes, it will be done (or your next
kernel's free).
- Step 5: Your new kernel is in
/usr/src/linux/arch/i386/boot/zImage. So let's copy it to
the /boot directory where all the boot files live. Type:
cp
/usr/src/linux/arch/i386/boot/zImage
/boot/vmlinuz-2.2.13
Do the same for the new System map:
cp /usr/src/linux/System.map
/boot/System.map-2.2.13
- Optional: Create symlinks that point to these two files.
rm System.map; ln -s System.map-2.2.13 System.map
rm vmlinuz; ln -s vmlinuz-2.2.13 vmlinuz
- Step 6: Edit /etc/lilo.conf to reflect the new kernel you want to
boot. My lilo.conf file alternately boots between my 2.2.13
kernel (boot label = linux) and the stock 2.2.5 kernel
installed by Redhat 6.0 (boot label = backup):
      boot=/dev/hda
      map=/boot/map
      install=/boot/boot.b
      prompt
      timeout=100
      image=/boot/vmlinuz-2.2.13
          label=linux
      	  root=/dev/hda2
          read-only
      image=/boot/vmlinuz-2.2.5-15
	  label=backup
	  root=/dev/hda2
	  read-only
- Step 7: Type /sbin/lilo to install lilo (the LInux LOader) with
knowledge of your
new kernel. Don't forget this! :) Now go ahead and reboot. If
you did everything correctly, you'll have a nice new optimized
kernel with functional APM support and much more. If not, go
ahead and reboot with the old stock kernel...
- To conserve disk space, you may want to go back into
/usr/src/linux and type make clean; make mrproper
to clean up the source tree. This will save substantial (tens of
MB) disk space. You can remove the source tree if you don't
need to recompile the kernel, but definitely leave the
/usr/src/include directory intact if you do any kind of
development work.
Note: You will want to rebuild PCMCIA
Card Services for the new kernel, so DON'T remove the kernel tree
until you have rebuilt PCMCIA.
The above sounds involved, and it is (albeit instructive)!
But being able to use the
suspend and resume features of your laptop is very cool
indeed. You can work weeks, months without ever rebooting your
computer! And your work is always right where you left it. :)
I recommend it highly.
A few notes on using APM:
- Once APM kicks in, upon the first suspend and resume, the CPU
will be running in power-saving mode and at a somewhat reduced clock
rate. This appears to be independent of any BIOS settings. I
suspect that this behavior is not seen if you disable the Make
CPU idle calls when idle compilation switch in the APM
portion of
kernel configuration. If you are running serious numerical
processing and need every cycle, you may wish to disable CPU
idling, or not suspend the processor.
- An alternative to suspend-resume is standby
mode, invoked by Fn-F3 instead of Fn-F4
(suspend). This turns off the LCD backlight and dramatically
improves battery life. You can also use apm, the BIOS, or hdparm
to spin down the EIDE hard disk after a specified amount of
time.
- Hibernation mode (Fn-F12, writing RAM to disk and
shutting completely down)
does not work in non-Windows OS's according to IBM. However, there
appears to be a hack in Linux to make it work... the link is
provided on
the APMD page.
- If you suspend from X-Windows, on occasion the screen will come
up garbled on resume. Just hit Ctrl-Alt-F1 to get to a
virtual console and flip back again; X-Windows just needed a
signal to redraw the screen. :) If this becomes a problem, flip
to a virtual console before suspending your computer.
Summary: APM works pretty darn well, with a few minor cosmetic
glitches. Linux properly
idles the processor after about 300 ms of idle time, and so
battery performance is quite good. Running the CPU full-bore,
with a mixture of light text editing, numerical simulations and
compiling/developing, battery life is about 4 hours. It can be
extended with judicious use of the CPU and shutting
off the backlight. Running the hard disk, floppy, or CDROM appears
to be the most substantial battery drain, followed by the LCD
backlight, followed by the CPU. This is purely empirical; I have
not evaluated the actual current draw of these devices.
 Back to Linux on a TP 390E
Craig Kulesa
Last modified: Fri Apr 14 01:18:58 MST 2000


 Back to Linux on a TP 390E