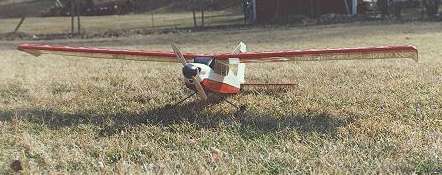
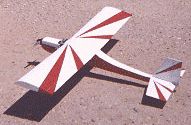
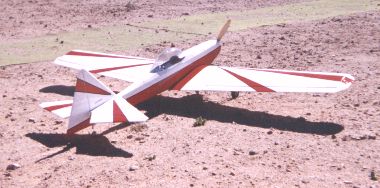
This $50-ish kit comes with most of the hardware accessories needed to get the plane in the air -- basically add CA glue, and two rolls of covering material! The cheap "Turbo 550" motor comes with the kit and includes a Grish 8x4 prop. The plans and instructions are geared towards the first-time builder and are excellent. The wood was of generally good kit quality, and the die cutting was OK (some parts required some sanding and refitting before assembly).
Mods (1990 version)
I ignored the can motor and used a direct-drive Astro Cobalt 15 on 12
x 800 mAH cells. I cut the recommended dihedral in half and added
ailerons, also adding Cessna-like "drooped" wingtips. I mercilessly
sanded the wing sheeting and fuselage. With Airtronics
miniservos, the plane weighed in at 52 oz. In a standard configuration
with a 7 cell 1400 mAH pack and the can motor, it would've weighed 46
oz, weighty for the can motor, but probably adequate for sedate
floating flight.
Flight
My first flight was in a grassy soccer field in 5 mph winds. After a
short 20-30 foot ground run, the plane darted into the sky. Climb rate
was excellent (and would probably be enhanced with a gear reduction
unit, especially with the cheap can-type motors). The efficient Selig
3010 airfoil was at home in this model; the plane had a VERY shallow
glide slope if the airspeed was kept up (it dropped quickly at the
stall speed). My first flight was 11 minutes in dead air even with the
tiny 800 mAH cells! (side note: My longest flight ever with this plane
was 45 minutes!) The ailerons are soft except at high speeds, so
perhaps the plane would be best off without them. This plane is better
suited for calmer days; the response in really turbulent, windy conditions
is not as smooth as most sport models with more symmetrical airfoils.
Summary
This plane would make a great trainer -- it's efficient and has no bad
habits. It will float forever with a modest gliding speed, so get used
to making shallow, low landing patterns! It comes ALIVE with cobalt
motors, but I have no doubt that if kept light, it would fly decently
with the stock motor on 7 cells. A good cheap replacement for the
cheap "Turbo 550" motor might be the Master Airscrew geared motor
system or the Graupner Speed 500/600 systems. The plastic cowl, now
becoming popular in CG and GP kits, is susceptible to damage on poor
landings however -- probably the single annoying feature of the kit.
If you want a fun flying model with pseudo-Cessna looks and long glide
times, you've found a good match in the Goldberg Mirage. Build one! :-)
I built and flew this plane as my first-ever RC plane, so this addendum to Craig's review is aimed at the rank beginner.
ConstructionDitto Craig's comments. Follow the directions carefully and you will have a flight-worthy plane (however, if you can, find an instructor before you build so they can look over your work at each stage).
ModsI built the plane as per the directions, but made these minor tweaks over the course of learning to fly. 1) reinforced the cowl with fiberglass tape around the inner rim, affixed with CA. 2) removed the back of the rear battery brace and held the motor pack in place with velcro. This allowed the pack to be shifted to get the right center of gravity. 3) the wire landing gear struts tended to pop out of their vertical slots. Ply crosspieces at the TOP of the slot held them in place (careful, though, if the crosspieces are in the wrong place they prevent the battery from sliding into place). I also had a lot of trouble with radio noise. Run the antenna outside the fuselage and attach it to the vertical stabilizer (not inside the fuse as Goldberg recommends).
EquipmentI used a Futaba 128 Rx, 500mAh pack, 2 S-133 servoes, and an AF217 ESC. I used the stock motor and prop with a 6 cell 1400mAh car pack. I would recommend a 7 cell pack. A gearbox and larger prop would be an even better idea (for better climb performance). You could also get away with standard servoes then, but if you're going to continue in e-flight, mini or micro servoes are a good investment.
FlyingHand launches were mandatory off grass. In flight it was stable and well-behaved. It is a floater - I did a lot of hiking to the far side of the field after landings. I've thermaled it for 20 minutes and only came down because I got tired. The one shortcoming was in climb. Climb-outs at our short field could be nail-biters, and I never felt it was safe to try touch and goes. This aspect would be much improved with the gearbox.
SummaryI was very happy with this plane. Goldberg definitely knows their audience. The Mirage builds and flies well as a trainer, with the proviso about climbing ability.
 review by Craig Kulesa, ckulesa@as.arizona.edu
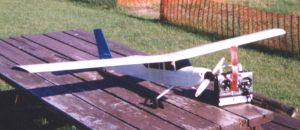
I got this kit through Tower Hobbies for $30, which is a pretty good deal. I don't see that they carry it anymore however. The kit itself is somewhat cheap -- it comes with some of the hardware necessary for completion (pushrods, servo rails, etc). The die cutting was not very good (lots of Xacto knife work, some refitting, lots of sanding), and some of the wood was of questionable quality. With judicious application of wood, I was able to avoid buying additional wood, however. The instructions are geared towards the seasoned builder, as there are few pictures -- you essentially have the plans and a sketchy guide to building the plane. Sufficient, but not for the first-time builder.
Mods
I cut lightening holes in the wing ribs and extended the wingspan by
2" total. I also capped the wingtips with stall plates to improve
slow-speed handling (aileron control is solid right on down to
stall speed). I used Dave
Brown Lite Flite Electric wheels (2") and built
my own tailwheel from light-ply to save 1/2 oz. The fuselage has a
nauseaous number of parts, which can be at least partially eliminated
to save time, improve strength, and reduce frustration. The two sheet
balsa sides have stick stringers which line the top and bottom of the
fuselage. I notched the stringers to allow the crosspieces to
friction-fit nicely -- the fuselage sides can join with some strength
without glue! This eliminates a lot of capping that the kit
recommends.
Flying
With the Astro direct-drive cobalt 15, an APC 9x6 prop and 10x1700 maH
cells, my SkyVolt weighs in at 52 oz. Takeoff is brisk and climbout is
rapid. It will fly level in dead air at "1/3"
throttle and will loop continuously at 2/3 throttle. The roll
rate is excellent at all flight speeds. It will even thermal decently
in booming lift! Flight times are typically 10-15 minutes of mixed
flying -- up to 25 minutes with thermal assistance!
Landings are slow and smooth, and glide performance is
pretty good. With its semi-symmetrical airfoil, it handles windy
conditions nicely, especially considering its size.
I used to use 12 cells and an 8x5 prop, but I found that de-rating the motor to 10 cells and using a bigger (9x6) prop was much more efficient! Using fewer cells also meant I could use high-capacity nicads for the same total weight as before, resulting in MUCH longer flights. This is something to keep in mind for models where the choice of a geared or direct-drive motor is not clear. (In the case of the SkyVolt, ground clearance issues prohibit using a prop larger than 9" in diameter).
Summary
The SkyVolt, while not an exceptional kit in itself, is a superb plane in every
way. It's one of the best 'all around' planes out there. From
hunting for big thermals to barnstorming aerobatics, high speed
passes, to crawling slow flight, with excellent control throughout --
the Skyvolt does it all nicely. I've been flying the same Skyvolt for
3 years now and and never get bored with it. Use a 200-300 watt class
motor, and you'll find it hard to put down the transmitter! (A good
stout 05 class motor (150 w) would also fly nicely if the weight were
kept in the 40's oz range.
 review by Craig Limber climber@rio.myra.com
After having built the Midwest Electric Hots there are a few things that I would suggest to anyone who wants to try their hand at one. Although the design was very good there are some changes that I made (and some that I would have made in hindsight).
I covered the entire airplane with red and white monokote (being a Canadian and all, eh). The electronics installed are as follows:
One of the local instructors took it off for me. It rolled about 7
meters on the grass and then climbed away sharply. He flew for a circuit or
two to check the trim and then proceeded to tear apart the sky for three
minutes. He performed several loops, rolls, stall turns, a couple of
spins and brought it in when he felt the power was starting to droop. Total
flight time was 3:45. The second flight we hand launched to try that out and
then I took the controls. Boy, I tell ya, its a whole new can of
beans flying that thing after my Goldberg Electra. It was flying level and
I took the controls. No problem. I then went into a mild left turn
(mild for my electra, that is). First thing I noticed was that I didn't
need to hold the turn like my electra. It kept rolling, winged over and
headed straight for the ground.......
EEEEEEEEEEKKKK!!!!!
I reefed back on the controls and sent it into a nice loop. It flew
in a big circle and I got it once more flying straight....up.
It started to roll from motor torque and I then put in some aileron....
Too much aileron and it did about 1.5 rolls before I stopped it. It
slowed down and I put some elevator into it and got it back to level
flight.
Whew!
The instructor watched all of this with interest. "A lot more
exciting than the Electra, eh?" was all he said. "Um, yeah" I said,
pretending that I did all of that on purpose.
I continued to fly about and did some rolls, loops and a stall turn or two on my own (some of them were even decent). The flight he made was with the throttle open up all the way, all the time. I feathered it for my flight and was able to extend the entire flight to 6:07 (although it was deader than a doornail when it landed; there was not even enough power to taxi on the grass).
Both the instructor and I agree that its slightly nose heavy (and the C.G. is located exactly where the plans say) and that the throw on the elevator is too high. The aileron throw is too low in his opnion but I think I will keep it there since I kinda liked it that way. I will increase it once I get some flight experience witht this baby. Warning: its a very twitchy aircraft to fly. As long as I don't crash it too often it will make me a much better pilot.
It performed very well (in my humble opinion). Its wing loading is higher than the local glow powered hots and you could see that by its glide path and vertical performance. However, after the first flight was over, several of the local flyers came by and assailed me with many comments/questions. One or two people were even considering building one.
All in all, the kit was a joy to build and went together well. Most of the changes that I would make to the kit are in the order of construction and to adapt it to the particular electronics I am using.
 review by Dennis Weatherly, supplemented by
Craig Kulesa
review by Dennis Weatherly, supplemented by
Craig Kulesa
The Ace Cloud Dancer is kitted as a glow .40 sized plane which makes a great conversion to electric. George Reece is the designer, and really knows how to build great looking, lightweight planes. The kit sells for $70 (street price) and includes just about everything you need to assemble everything (including a set of wheel pants). The die cutting is beautiful, and the wood quality is consistent and excellent. It uses balsa spars, which concerns me -- so be very careful to ensure a solid, carbon-fibered or fiberglassed center wing joint and solid shear webbing! I can't emphasize this enough...
Mods
The kit is already pretty lightweight, but a number of things can be
improved to maximize electric performance. This is a combination of
mods that Dennis Weatherly has made and ones that I have added:
I replaced all of the lite ply in the kit. Fuselage sides, 3
wing ribs. The heavy ply firewall was replaced with balsa (I
used a horizontal side-supported platform to strap the motor
in). I replaced the bottom balsa cowl block with 1/8" planking
and just cut holes in that to allow cooling air to enter (Dennis made
a scoop). I left
the first bay of the fuselage bottom (behind the wing) uncovered
to let cooling air escape. I extended the wing 2" to 62". I cut
lightening holes in the ailerons, left off the fuselage sheeting, and
sanded the entire plane mercilessly. Dennis added a removable hatch
over F2-F6 for access -- I just made a removable hatch for the motor
section. I used Dave Brown Lite-Flite electric wheels to save 2 oz
(2.5"), Airtronics mini-servos and a small 270 mAH receiver pack.
Flight
Dennis and I are using Astro geared Cobalt 25's and Master Airscrew
Electric Series 12x8 props; I'm using 16 of the
1700 maH SCRC cells, and Dennis is using 14 of those cells. [Update:
Dennis is using 16 cells and a 12.5x6 prop now] My plane
weighs 5.3 lbs all up, Dennis' weighs 5.5 lbs. This plane is an
absolute joy to fly! Takeoffs can be nearly immediate or smooth and
graceful. Climbout is very brisk and steep (my very first takeoff was
essentially vertical)! With smaller
nicads, it will probably have really unlimited vertical performance. I get
typically 8 minute flights with aerobatics most of the way, about 9-11
minutes just putting around. The plane is neutrally stable and has no
bad habits. The plane likes to fly at a fairly constant speed, never
going very fast, but always very solid (it "tracks on rails") even in
windy/gusty conditions. Landings are stable, slow, and
smooth. Aileron response at low speeds is softer than with the
SkyVolt, above.
Summary
If you want an awesome-looking large, versatile, great-handling,
sport-aerobatic model, you just can't go wrong with this plane! And
yes, slowed way down, it will even (sorta) thermal in whopping lift.
The Goldberg Electra was the very first RC airplane I completed and the first I ever flew. We have an excellent set of instructors here in Victoria, Canada and soon I was soloing and even competing in contests with it a few flying-days later (losing but competing nevertheless).
I constructed the airplane according to the instructions except for a few small changes that I am glad I made. I installed a 1/8" piece of balsa with velcro on both sides where the motor battery, receiver battery and receiver are to be installed. This was from a suggestion from Harry Higley's "Entering Electrics"; a book I very highly recomend. I mounted the batteries and receiver on it and it allowed me to move the batteries around for balance. When it first flew the center of balance was exactly according to the plan but it tended to stall and required constant elevator control. I moved it forward about 5mm (by shifting the motor battery all the way forward) and it flew a LOT better. I was worried that this arrangement would not hold my battery pack firmly but there has never been a problem. I did have some trouble squeezing the receiver under the wing so if you install something like this, make absolutely sure everything fits.
It has the removeable wing panels according the plan since my largest dimension of the cargo space in my Bronco II is less than the full wingspan. One of my panels is slightly out of alignment so I would suggest that if anyone does the same I would recomend you construct this part VERY carefully. I eventually retro-fitted sheer webs when the wing proved weak. See the second update below.
I broke my motor in again following advice from "Entering Electrics" and it seemed to make a difference when I was testing the whole thing later on. I noticed that with a fully charged 6 cell battery packs the 20 amp fuses that it came with just were not enough. They kept burning out. At first I thought it was the battery packs but a fully charged pack can approach 10 volts! Since I used the on-off method of motor control this first burst of power exceeded 20 amps. I switched to a 25 amp fuze and everything works just fine. Hmmm, lets see, what else did I do? Oh yeah, the servo that controls that motor was first installed using velcro but this was not "solid" enough so I took the velcro out and installed a servo tray and epoxied'ed it to the side of the fuselage. This part was the ickiest portion of the construction and I will stick with speed controls in the future. Trying to get the servo to line up nicely with the motor switch while the glue was drying was a real bear.
It was this airplane that got me my "A-wings" at my club meaning I can fly without the assistance of an instructor. Unfortunately, I didn't learn to do proper take-offs with this airplane (no landing gear) which is a skill I found I lacked later. However, it was still a great plane to start with since its floats about and if there is a problem, it will steady out by itself.
UPDATE: Summer 1995Well, I finally bit the bullet and refit my Goldberg Electra with a geared motor.
I removed the old motor, the motor switch and controlling servo and installed a geared Astroflight 05 cobalt motor (standard version, not FAI), a 12x8 master airscrew folding propellor, a sermos fuze holder to hold the fuze outside the fuselage, an AI/Robotics FX35 speed control and converted all connectors and both 6-cell 1500 mah battery packs to sermos connectors. The BEC on the speed control is disabled and I stuck with my 600 mah receiver pack. The entire process took about three hours.
Anyways, I tested it for the first time last night. It appears that the climb has increased by about 30% and overall flight time by about 25% which is significant although I had expected a little more. Mind you, the aircraft it about as heavy as it can get. Its covered with flourescent Ultracoat plus (a very heavy covering), a standard size receiver, standard size servos, a relatively heavy speed control and a heavy 600 mah battery pack. Fully loaded, the aircraft weighs 1530 grams (54 ounces). Also, I am only using 6 cells. So, I guess this is more or less what I should have expected. I really like the increased flight time, however. Our club field is quite crowded and the average time between flights is often around 1 hour during the weekend. Problems: just two. I found that the new motor/propellor combination generated too much torque for the motor mount. As I was testing it, I was terribly worried that it would twist its way out as it pulled forward about 1 cm and turned about 15-20 degrees. Also, it did not always settle back into the same place when the power was reduced. To fix it, I installed a lite-ply holder on top of the motor that is bolted to blocks of lite-ply I glued to the walls of the fuselage. It holds the motor down and prevents it from moving forward.
The second problem was with those damn astro brush holders! I had to gouge a big hole in the motor mount in order to fit it PLUS the suppression capacitor got in the way as well. Grrrrrrrr.
Overall, I am pleased. The motor sounds much more interesting than before (up close, of course, it's inaudible if more than 30 meters away) and the brake on the speed control works perfectly with the propellor folding nicely against the fuselage every time. However, considering how the motor and gearing itself cost almost twice as much as the original aircraft kit, I would recommend a refit like this to only the most serious/financially secure modelers. The Master Airscrew greared motor and folding propellor might be a very affordable alternative (and was in the running for some time as the new powerplant for my aircraft). I had a few bucks floating around so I thought, what the hell! Second Update: Spring 1996My Electra has well over 150 flights on it now with an average flight time of 12 minutes and a max of 25 minutes (I rarely float, I like to loop and stuff) for a total over 30 hours in the air! Even though I've had the airplane for three years now I've only recently decided to learn how to thermal hunt. Hopefully I can get a guage for how long it can fly for this summer. Its been pranged several times revealings its greatest weak spot: the cowl. Even a bumby landing is enough to crack it. The balsa where the bolts that hold the cowl on got all ripped up and I eventually replaced it with some plywood. If you have one, order a spare cowl or two from Goldberg or East Coast Model Center (where I got mine).
Last summer I used my electra to partake in a local fun-fly against 40 other club members and I came in THIRD!!! It was the only electric aircraft and it flew against some major airplanes including Morris hobbie's monsters that can hover. Considering how much (well meaning) teasing I get from the other members about my choice of power it was quite gratifying. To quote the club president at the time: "I guess you showed us with your electric".
However, I crashed it badly on the final event and lost the fuselage from the wing saddle forward. It has, however, been rebuilt and has had micro servos and receiver installed, the 6 cell pack has been replaced by a 7 cell pack and the FX35 has been replaced with an Astro 211 and it performs even better now. I found I liked to do loops and stuff with this and realized that the stock wing was too weak (it didn't actually break but I was getting buckling of the upper sheeting). I removed some of the bottom covering, installed some small sheets of balsa doubling the sheeting between the ribs and added shear webbing from the spar up to the sheeting. It got an acid test when I was letting the boss fly it and he kinda lost control. I grabbed the transmitter and pulled up at the last second after a long, steep dive (you could hear it whistling through the air) and the wing was able to take it. Yoiks!
I have bought a another copy of the kit (it was a return and extremely cheap) and intend to make another wing for it that has carbon-fiber reinforced spars, better shear weebing and micafilm for the covering, I should get the mass down to 1360 grams (48 oz) with the 600 mah receiver pack and 1320 grams (46.4 oz) with a 225 mah pack. I even made up an 8 cell, 1000mah pack for those times when I really want to see it clawing its way to the heavens. I'll let you know how it goes. The airplane bears little resemblance to the original configuration! The only thing that hasn't been replaced is the fuselage, tail and canopy.
Introduction
When I first saw the Tigerkitten "E" as published by Bob Benjamin in
Model Aviation, September 1991, it was love at first sight. First
there
was the appeal of its looks, a graceful 1930's-style low wing
monoplane
with open cockpit and big streamlined wheel pants. That's my kind of
airplane, all right. Then there was the quality of its engineering.
Here was a plane specifically designed for electric by someone who
obviously knew what he was doing. Nowhere is there a mite of excess
structure, unnecessarily heavily material, or artless structure. Too,
the
many photos were dynamite, clearly showing important features of the
design and showcasing a quality of craftsmanship that I envied, and
still
envy. I sent away for plans, but never built the 'kitten at that time
because I had seven cell battery packs and a seven cell charger and
wasn't ready to invest in equipment for the nine cell packs that
Benjamin
recommends for an Astro cobalt .05. Now ACE R/C has kitted the
design, I
have taken the plunge and built it, and our story can continue.
Even if you decide to build the kit, I recommend that you obtain the original construction article, if possible. Dispensing with specific instructions on how to build the plane (these are supplied with the plans), the article is instead crammed with information on the philosophy underlying this design and a lengthy discussion of appropriate equipment - batteries, speed controls, connectors, propellers, and so forth. Also, you can see two versions (Astro .05 and Astro .15 powered) of the Tigerkitten flying in promotional videotapes issued by AstroFlite. The video convincingly demonstrates the aerobatic capacities of this design Your local hobby dealer may be able to lend you a copy. Mine did.
The Design:
We are talking about a 54" wingspan, 450 square inch beauty which will
weigh 50 to 65 ounces depending on hardware and builder skill. This
airplane has been designed for a geared Astro cobalt .05 and 9 cells
or a
geared Astro cobalt .15 and 12 cells. To this ACE has added
instructions
and motor mount material for a MEC Turbo 10.
The design is unusual in several respects. The Tigerkitten kit is available in electric or glow versions. Unlike many contemporary electric kits which are conversions from glow designs, the glow version of the Tigerkitten was derived from the electric. Modifications for .25 glow largely consist of substitution of hardwood or ply for balsa in critical places. Glow instructions are added in italic type to the original electric instruction manual and are obvious paste-on added to the original electric plans.
Accessibility has obviously been an important design consideration. Removing the cowl exposes the motor and motor mount for inspection and adjustment. A hatch, retained by one spring loaded latch, runs from the firewall to the rear of the cockpit, making battery pack changes quick and easy. Most of us know that in a crash, our heavy battery packs thrust forward, obliterating everything in their path, and often what is obliterated is an expensive radio receiver (do your really want to know how I know that?.....nahhh). Something I particularly like about the 'kitten is that a 1/16 ply deck runs from the firewall to the rear of the cockpit, supported by longitudinal rails and retained by wood screws. The battery packs are mounted on top of this deck, and the radio switch, arming switch, and charging jack protrude upwards through it at the rear where they may be easily reached through the cockpit. The receiver, speed control and receiver battery are all mounted to the underside of this deck where they are protected from flying battery packs. They can be reached for servicing by removing the wing, or the entire deck with all equipment can be unscrewed and lifted out. Fine idea!
The Kit:
To begin with, this is an excellent kit. My local hobby dealer hates
ACE
kits because the parts are protected by shredded scrap paper - lots of
it
- which loves to jump out and mess up the floor no matter how
carefully
you open the box. Friend dealer would rather you just took the kit
home
and looked at it there. ACE rather defensively puts in a slip of paper
pointing out that putting this waste paper to good use is ecologically
sound. Well, OK: nuff said about that.
Within, you will find excellent and consistently light materials and a very complete array of hardware. Many parts are laser cut while others are cleanly die cut. There are well drawn plans,a 16 page instruction book illustrated with both photos and drawings, and enough decals to provide two or three choices of color for each. With two exceptions, I was satisfied with the kit material and felt no need to replace any of it. In the original Tigerkitten design published in Model Aviation, the ailerons are built up. In the kit, solid ailerons a full 1/2 inch thick are supplied. Although the wood is light, I see no need to haul such hefty chunks through the sky. My solution was to drill a series of wide holes and cut out the material between pairs of holes. This produces the near equivalent of a built up aileron and, additionally, looks rather pretty under transparent covering. Where the original plan shows a rather graceful landing gear of .090 aluminum, the kit supplies a broad and hefty gear of 1/8 aluminum. I don!t like the idea of hauling that much metal around and was sorely tempted to get out my drill and apply the good old swiss cheese approach, but on the advice of people who answered my query about this on an e-mail conference I refrained. I suspect you might want this much gear if you are going to use 12 cells, but I'm not convinced it is necessary for the 9 cell version. If you feel a need to shave weight, here is a place to start.
Construction:
Be prepared to spend some time building this kit. All flight surfaces
are built up and the fuselage is an assembly of 3/16 sticks. No
special
tools or techniques are required, but this is nevertheless a builder's
model. There are, of course, very adequate construction instructions
in
the kit. I intend to do no more than note a few tips about things
that
are not obvious from the plans and booklet.
Wing tips and tail tips:
The tips of all flight surfaces are constructed free flight style by
laminating four layers of 1/16 balsa around a form. I thought
supplying
die cut forms with the kit would have been a nice touch, but here you
are
left to your own devices. The instructions suggest that you could
stick
a bunch of pins in the plan and laminate around them, but this I would
discourage. The result is bound to be lumpy. What I do suggest is that
you cut strips of 1/64 ply off the scrap edges of the supplied die cut
sheet and glue these to the edge of cardboard forms. This will provide
a
smooth clean edge which you can then wax by rubbing with an old candle
in
order to produce smoothly curved tips.
Wing:
If the part of building I like least is building wings, the part of
building wings I like least is installing webbing. Guess what? The
Tigerkitten has webbing the full length of the wing on both sides of
the
spars. Oh well, that's where the wing's strength plus lightness comes
from, so live with it.
The Model Aviation article stresses the importance of strengthening
the
wing by notching the wing ribs into the trailing edge. In the kit,
this
is rather inconspicuously shown on the plans, but is not mentioned in
the
construction booklet. Do it!
A step that is specified but is easy to overlook is adding 1/16 strips
along the length of the trailing edge on both top and bottom. This
not
only thickens and strengthens the trailing edge but also allows the
rib
capstrips to join flush with both the trailing edge and the leading
edge
sheeting.
Fuselage:
There's lots to do here, but nothing very mysterious. Like the
trailing
edge, the fuselage longerons receive a lengthwise 1/16 strip which
extends from the aft edge of the forward fuselage sheeting to the aft
end
of the fuselage. Don't miss adding this.
The construction book says to drill the plate which will be tapped to
receive the wing mounting bolt with a 11/64th drill. I think the
correct
size is 13/64".
Hatch:
The hatch which forms the fuselage top from the firewall to the rear
of
the cockpit is formed of 1/16 balsa formed over a structure of formers
and stringers.
If used as is, the front former will block two air cooling holes which
are laser cut into the firewall, and the former is not strong enough
to
withstand removing this material. My solution was to use thin CA to
bond
scrap fiberglass (from the strip supplied for joining the wheel pant
halves) to the back of the former before assembly. Once the hatch is
assembled, material can be cut away easily by using a sanding drum on
a
Dremel tool or equivalent.
Be careful not to trim the hatch sheeting flush with the front of the
front hatch former. This sheeting should protrude over the top of the
firewall. The best idea is to install the completed hatch and then
sand
the sheeting flush with the firewall.
Flying:
Watch the Astro Flight video and you'll be convinced. As for me, I am
still feeling out my Tigerkitten. After only five flights what I can
tell
you at this point is that this airplane is stable and easy to fly.
Using
an Astro cobalt geared .05, a Master Airscrew 11/9 electric prop, and
9
1400 miliamp SCR cells, mine takes off quickly and climbs to cruise
altitude as fast as my .40 glow powered Spitfire - in fact my
impression
is that it gains altitude somewhat faster. At full throttle, the
Tigerkitten is very responsive, but at low throttle it turns out to be
a
floater. Not only will it loaf along, on one lifty day it clearly
wanted
to exercise its talents as a thermal flier.
My only problem has been with duration. Using an Astro Flight Model
215
Micro-speed control and Astro connectors, my power on duration is only
3
1/2 minutes. I do not think this is the Tigerkitten's fault because I
have had similar results with previous planes. I bring the matter up
in
hopes readers of this review will give me advice for improving flight
duration.
Back to the High Voltage Page!
Craig Kulesa